Chapter 9: Animate
Chapter 9: Animate
Chapter Nine “Animate” was all about thinking about your animation (big picture) frame by frame. It is important to not only have all the tools to create an animated story, but also focus on unifying your elements into motion. Chapter nine started with an immense amount of encouragement. Liz Blazer stated, your animated project will work just as planned. You only need to follow a few insider tips that will keep you centered and moving forward towards your goal.
Building up confidence to tackle your project is one of your first steps. Tackling the low hanging fruit first is the most fun, short, and easy to animate scene. After you take care of the “low hanging fruit” you can move on to the more intimidating and difficult sequences. The best way to go about this is breaking it into pieces.
When you break up the challenging components in your animation you will not only create less intimidating content, but also will reinforce the important notion that animated sequences are often mini-story arcs with distinct beginnings, middles, and ends. Liz Blazer presents an example of the “Launch of a Spaceship” to express the energy, forward momentum brought on by fire to the final lift-off.
Fundamental 1: Get out of the center – Try not to plop your subject in the center of your frame (too often)
Fundamental 2: Mix up shot length – Mix up your shot lengths. Long shots, to medium shots, and then close ups.
Fundamental 3: Mix up shot timing – Vary the time of your shots so your sequences move at different paces.
Below is a recap of Animate,
Animate Recap
1. Easy shots first to gain confidence
2. Break up tough shots into pieces
3. Plan well so no animation is cut
4. Back up your digital files
5. Pose your shots before animating
6. Movement tip: Always anticipate and follow through
7. Compose directional movement for whole film 8. Compose shots so subject isn’t always in the center
9. Mix up shot length throughout film
10. Mix up shot timing throughout film
11. Add blur and vignettes
12. Be flexible with soundtrack
13. Listen to sound while animating to hit sound marks
14. Mute your soundtrack to check movement

Animation Inspiration
UI Animation: Inspiration
UI Animation #1
Sometimes I find the best inspiration comes from learning something new. In this After Effects motion graphic tutorial Mike Ridolfi (@MikeInHD) reproduces a beautiful Material Design Google Music App. His tutorial is based off of the UX design shown when Google unveiled Material Design in 2014. In addition, this material design after effects tutorial should have show you everything you need to know to create an app design in Photoshop / After effects and give you a general insight for graphic design tutorial techniques and app design tutorial for beginners.
UI Animation #2
Learning how to create an animated UI cursor was critical towards completing my UI animation this module. Ryan Duffy’s animation taught me exactly how to create an animated UI cursor in After Effects. It is important to understand that our users interact with desktop much differently than they would with mobile or tablet. With a laptop (desktop) the users will click links and pan around with either their (wireless/non-wireless) mouse or trackpad. With mobile the user will use their fingers to interact with different UI elements. Given that mobile users use their fingers to interact with their screen, I needed to convey the touch of their fingers on my UI animation. Ryan Duffy’s tutorial was exactly what I was looking for. He inspired me to breakdown the creation of a UI cursor in easy to learn parts.
UI Animation #3
This was one of the first navigation animations I came across, with a quick “Navigation Animation” Google search. What I like about this user interface animation is the interactive animated clicks and perspective. It feels as if you are the one controlling the mouse. The panels that flip to create words is a very inspiring and creative idea. You can tell the animator made sure the sound effects were precisely aligned with the users clicks.
UI Animation #4

Ludmila Shevchenko showcases Tubik’s design agency services
This UI animation by Ludmila Shevchenko showcases the services Tubik’s design agency provides for. I absolutely love the color pallet that Ludmila used for her animation. The variety of colors used in the interface echoes the variety of services it Tubik provides. It certainly creates a positive first impression and supporting positive user experience with engaging design solutions. You can find more of Ludmila’s work here or her agent here.
UI Animation #5
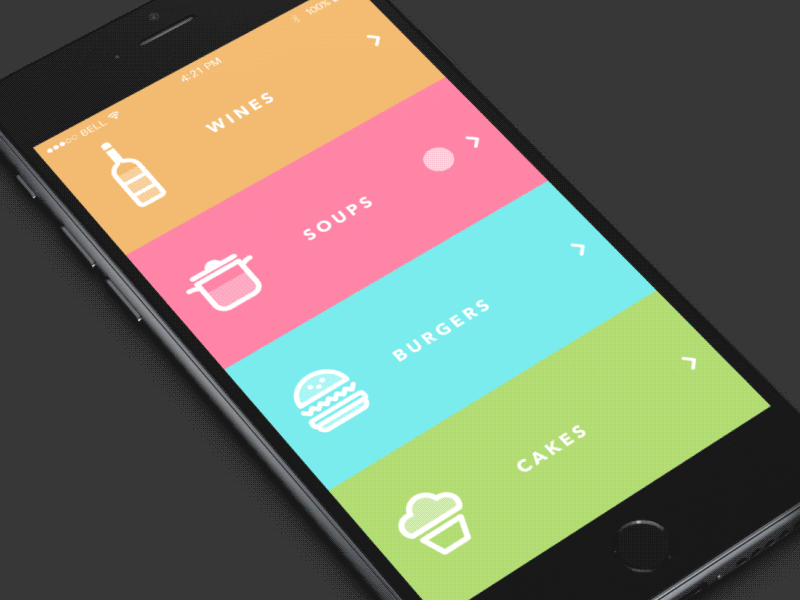 I love how the food icons bounce when the user glides their finger down the content bar. Even the liquid in Sergey Valiukh’s food icons have a personality of their own. The colors are fun in an attractive way and also separate the sections well. It is evident that Sergey Valiukh’s attention to detail and motion was critical component to complete this UI animation.
UI Animation #6
 I really like the imagination that went behind this UI animation. Those of us in and even out of design all know how a radio button does on press. You can either slide it left or right. However, what Ramotion completed pushed the concept further and made it attractive. With Google’s Material design, not only is this doable but it is a simple solution that makes for a well executed UI animation.
Puppy UI Animation
Low Poly Puppy - UI Animation
Overall I had a lot of fun with this project. My favorite part was concepting. After collecting my interface animation inspiration from various sites and watching several Youtube tutorials I was ready to build on a interaction. Going into this project I had a lot of ideas, such as a virtual zoo or iMessage conversation. These ideas sounded good on paper, but would not fill the requirements as well as I imagined. Selecting a UI animation that would show the user where the cursor is (or in this case where the user will tap the mobile screen) was just as important as looping it.
I started on paper with a few sketches. I knew I wanted to do a mobile device UI screen, so I began by making a few vertical rectangles to represent the devices screen. Combining my own illustrations within my project was very important to me. Using royalty free images is great if it is sourced, but using your own work is even better.
After watching Youtube tutorials specific to After Effects “effect panel” last module I had a better idea how to work with effects and key frames going into this project. I hit several road blocks, such as getting my dog illustrations clipped to a shape and cropping my After Effects project. However, majority of these problems were resolved by a quick Google search. Seeing how other animators solved these issues as well as organized their composition and pre-compositions was very helpful.
I found that the reading this module helped me focus on one element at a time. It might be hard to tell, I have a couple interactions occurring at the same time in my UI animation. Such as the circle representing the users touch on the screen and puppy illustration. What I found useful during this project was creating multiple pre-compositions. This did not only separated my elements, but also kept my file extremely organized.
Puppy Illustration – I created my low poly pups in Photoshop and Illustrator. (Sketched on iPad Pro with a Apple Pencil)
Music – I decided to keep the music up beat and happy, without taking too much attention from the UI animation. Since puppies tend to give a happy and up beat impression I thought it was a good fit.
Sound effects – I used sound effects that would go along with the puppies and push the circle animation (that represents the users touch on the iPhone) further. It was important that my audience felt like they were participating the UI puppy interaction.
Audio – The idea of being in the environment of the puppies and participating in the UI interaction was incising. I knew when the puppies appeared I wanted to use sound effects for them as well as the users touch on the UI elements.
Animation – I wanted to incorporate a few of the 10 principles of animation that we learned from the previous chapter. Brainstorming ways I can incorporate these principles into my UI animation was a great re-cap. 🙂
Type – Originally, I wanted to animate the text in my UI animation. However, I did not want to take the attention away from the users interactions in my UI animation. Going into my project it was important that my UI animation was simplified and not overwhelming. I found that having static text was the perfect combination with the interactions since the copy would be easier to read and could be read multiple times without it leaving the stage.


Puppy UI Animation - (Gif)
Puppy UI Animation - Gif

