Chapter 4: Color Sense
Chapter 4: Color Sense
“Chapter Four: Color Sense” and “Chapter Five: Weird Science” were two enjoyable reads. I was particularly intrigued by “Chapter Four: Color Sense”. Color Sense was unlike any chapter we read so far in Liz Blazer’s book Story Telling. “Color Sense” was all about selecting the correct color palette to enhance your storyline. Liz Blazer provided simple guidelines to plan your palette and enrich your story with well-informed color choices. It is amazing that color can tell a story of it’s own. It can express emotion, clarify motivation, and dictate the entire meaning of a piece.
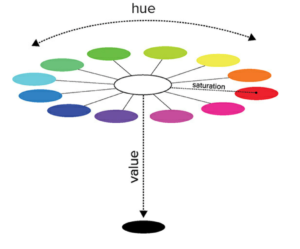
Here are a few definitions that I heard of, but was not entirely familiar with their definitions. I decided to type them down since Liz mentioned that we would be using them throughout the chapter as well as the value chart below.
Hue – refers to the common color name in the spectrum like red, blue, green, blue-green, and so on.
Saturation – is the intensity or purity of a color. Highly saturated colors look vibrant and bright while low-saturated colors look dull, almost grayish.
Value – is the relative lightness or darkness of a color—basically how much light the color is exposed to determines its value. Low value means a color is closer to black.
Creating a color script requires you to reuse your cue cards from the previous chapter. A color script is a script that is a sequential visual outline of how you intend to use color in your animated film. I like that this process is highly experimental and somewhat unusual. By limiting your color palette your eye has time to explore and investigate compositions. The hardest part seems like it would be to define your storyboard in one color. Especially, if your story board uses a variety of colors throughout it’s script. I thought this was a very neat approach to creating a color script. Liz Blazer explains that by identifying the key moments in your script you can understand the color for emphasis behind it.
Pre-color script (PCS) – This is your storyboard represented by a series of single colors, one for each board. (Each color in the series can be repeated.)
Color Recap Color Vocab: Hue, Saturation, and Value Make Color Scripts to Emphasize
Key Moments
Tip 1: Limit Your Palette
Tip 2: Support (Don’t Upstage) Your Subject
Tip 3: Select One Thematic and One Accent Color
Tip 4: Use Saturation Mindfully
Tip 5: Use Surprise Color for Punctuation
Tip 6: Design for Movement
Tip 7: Make Your Own Rules
Chapter 5: Weird Science
Chapter 5: Weird Science
Chapter Four: Weird Science
Chapter four, “Weird Science” discussed the history, need, and process for experimenting with animation. Liz Blazer, provided several visual examples as well as a case study to have us think like a professional animator. This chapter reminded me a lot of the Introduction and first chapter, however brought together some of the ideas and concepts we learned in the previous three chapters. Experimentation is an essential step to getting the most out of the animated process. Experimenting with animation can furthermore help you to define moments in your work. I was surprised to read that some skeptics fear the word experimentation. These skeptics believe experimentation implies whimsy, which they believe is synonymous with wasting time. It is evident that the meaning of experimentation is the complete opposite of what these skeptics believe experimenting is all about. Experimentation can even benefit the oldest most sacred techniques and methods.
The importance of creating “Bad” Art was not a experimentation method I thought I would read about during this chapter. art. Creating “Bad” Art requires you to forget about careful color choices, go against your instincts with design and technique and ultimately get in there and make a mess. However, I can see how this method can allow you to generate new ideas and let go of ideas that you should probably step back from. It is evident that may even decide to incorporate some of your “Bad ideas” into your final project.
Here are the steps to apply your “Weird Science” to your current project:
Your Film’s Experimentation List
- Draw up a graph with each scene’s number on the left side and a series of columns at top listing areas where you might experiment with those scenes. (Examples – Technique, Design, Movement, Transitions, Sources, and Sound)
- Consider how your project as a whole might benefit from each area of experimentation. You may decide that there are many possibilities or just a few.
- Go through each of your storyboards one by one and consider how you might experiment with each of the topics listed in the column. If you think there’s something there, take your best, wildest shot.
“Make the work you want to be hired to do” was a really powerful focus in chapter four. To many times we create work strictly inspired by specific medium or concentrations. We skip the big picture of what type of impact our work will have on our viewers. When a designer or animator gets known for doing something well, clients will come back for that specific that thing. Having a design or animator style is great, however It is very important to switch things up a bit and really create what we want to be paid to do. Side projects allow us to do these experimental opportunities when there is no room within our current occupation to execute such a piece. Liz Blazer’s provides a very good example of this showcasing Marco’s Study. Macro Study features filmic title sequences with dark, suspenseful soundtracks and close-up images of everyday objects shot with a macro lens. It was the work Marco wanted do and be known for. It is clear to me that Marco was making work that he wanted to be hired for.
Weird Science Recap
1. Free yourself to make “bad art.”
2. Work on the edge of your skill set.
3. Make the work you want to be hired to do.
4. Keep working on your personal projects.
5. Make a Project Experimentation List.
6. Experiment with transitions.
7. Experiment with movement.
Animation Inspiration
Stop Motion Animation: Inspiration
Most of the inspiration for this module I found online and Instagram. Instagram was extremely useful since it allowed me to search for specific hashtags. For an example I was able to see the too posts within the hashtag #papermotion. This allowed me to find well executed stop motion animations and also be specific for what I was looking for.
Stop Motion Animation #1 - (Snowman Carrot Nose Morph)
This stop motion animation has A LOT of frames. It in fact has so many frames that it seems to feel more like a video than a stop motion animation. Although, we all know these are fictitious characters made out of craft materials (clay). The storyline is fun which is also why I decided to pick this stop motion animation. The idea that the fish transform into the snowman’s nose is an entertaining and well thought out execution. I did not expect the fish to transform into a carrot for the snowman’s nose. It is evident that the concept of not expecting something to happen is a very intriguing technique.
Stop Motion Animation #2 - (Paper Storm)
This is one the first stop motion animations I came across during my research phase and also one of my favorites. It is neat to think that a number of photos were combined to create this animated affect. I also like how the artist used her hand in her stop motion animation. The combination of cut out paper and hand movement makes for a successful composition. She also uses a limited color palette. The colors she does choose to use are fun and bright colors, other than the thunderstorm cloud. It is evident that this animation does a great job capturing a story through colors, shapes, and movement.
Stop Motion Animation #3 - (Food Fight)
During my inspiration phase I focused my attention to stop motion animations using paper and unusual items. I was particular interested creating a storyline with food items, so I went ahead and researched stop motion animations using food. I was surprised to find an assortment of different stop motion animations after googling “Food stop motion animations”. There was a mixture of linear storylines and non-linear storylines using the formats we learned from Liz Blazer’s book. Having the food “realistically” come to life was what I was most interested in accomplishing. Above is what happens when you you Youtube “Food Fight Stop Motion Animation”. I thought it would be funny if the food items acted like people, so I went ahead and searched for “Food Fight Stop Motion Animation”. To my surprise I found exactly what I was looking for. Food throwing food at food. This was a great example of a stop motion animation using food, while applying a creative humor twist to it. I used this as inspiration for my first stop motion animation using a linear storyline.
Stop Motion Animation #4 - (Origami)
I love that this stop motion features different animals made out of paper. There is something about it that makes it feel extremely real. The sound effects of the animals during this stop motion is definitely a bonus. I also admire the 3 dimension the artist is able to achieve with her medium, paper. I have seen a mixture of 2d and 3d paper stop motion animations. However, I have definitely gravitated more to the 3d paper stop motion animations.
The idea of using a wide range of materials to create a stop motion animation has peeked my interest this semester. Origami is such a fun arts and craft activity for both kids and adults. To see the paper come to life to form these delicate figures is such a fascinating site. Using paper to create 3-dimensional objects is definitely an effective technique.
Stop Motion Animation #5 - (Winter Olympics)
I really liked how the storyline in this stop motion animation was relevant. It captures a paper figurine jumping off a winter Olympic slope, which is made out of paper as well. The set is very well put together as well as the photos. I came across a lot of stop motion animations that lacked quality or did not have either a compelling linear or non-linear storyline. The readings on linear and non-linear storyline’s definitely helped me create something one of a kind and also interesting. I would consider this stop motion animation as a successful example of a linear stop motion animation storyline.
Test Animation
Test Animation (Testing 1, 2, 3)
Here’s a test clip of my stop motion animation. This test stop motion animation clip will prepare me for production. Having completed this test I now have a better idea of what my linear and non-liner stop motion animation will need. I learned during this test animation how to adjust the rig I had that holding my Canon, how to properly adjust the lights, play with focus/depth and try a few different techniques I learned.
I decided to use fruits and paper in my test animation, since the focus in both of my storylines use paper and fruit. I was curious what it would be like using these objects on a flat surface. At first I had some problems with the oranges (rolling off the set) and the paper (moving around). I found that marking spots very lightly on my set helped prevent misplacing my previous shot. I also learned that moving objects with a tooth pick works really well. I plan on using these techniques in my final stop motion animations.
Funny story – I was just about to take my last photo of the #3 I drew when I experienced a power outage. Luckily when the power went back up (4 hours later) the lighting and positioning of my objects were the same. 🙂 *phew*
Stop Motion Animation - (Linear)
Banana & Peanut Butter - Stop Motion Animation
I had a lot of fun putting together my stop motion animation storyboard and storyline summary for my banana and peanut butter idea. The idea is to evoke emotions of the audience with food. I plan on having food utensils come to life that will create a banana and peanut butter sandwich for my stop motion animation. The food products and utensils will play around the set prior to creating the banana and peanut butter sandwich to curb the hunger of the audience and prepare to solve for the problem of hunger and preparation. The problem (hunger/appetite) will be resolved once the sandwich is completely eaten.
Creating my storyline and storyboard prior to starting my linear stop motion animation will allow me to go into my animation with fresh ideas and execute a project focusing on the beginning, middle and end sequences. I chose to use a peanut butter and banana sandwich for my stop motion animation, because my favorite thing to eat is a banana peanut butter sandwich.
Stop Motion Animation - (Non-linear)
Orca - Stop Motion Animation (Non-linear)
For my second animation I would like to combine my low polygon animals with paper stop motion animation. After conducting research on stop motion animation techniques and completing our storyboards I have a better idea of how I would complete my animation. Prior to completing my storyline summary I had many ideas, however have narrowed my ideas down and have been able to focus on my storyline.
I plan on recreating my low polygon killer whale after the site I have been publishing my work to, orcajourneys.com. Orca whales are magnificent creatures that have unique color patterns. They can be recognized by the human eye with a minimal number of colors and shapes. It was important to me that I represented my whale in as few colors as possible while constructing something realistic.
I will be recreating my whale, paper triangle by paper triangle until the entire anatomy of my whale is constructed. “The Puzzle” format will purposely keep my audience in the dark of what the result of my stop motion animation will be.
This is the Orca I plan on recreating in paper for my stop motion animation.